Merge#
Use the Merge node to combine data from multiple streams, once data of all streams is available.
Node parameters#
You can specify how the Merge node should combine data from different data streams by choosing a Mode:
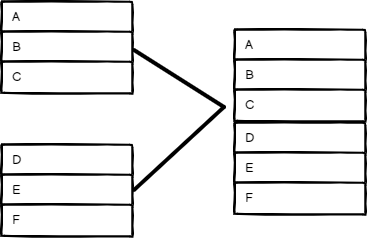
Append#
Keep data from all inputs. Choose a Number of Inputs to output items of each input, one after another. The node waits for the execution of all connected inputs.
Combine#
Combine data from two inputs. Select an option in Combine By to determine how you want to merge the input data.
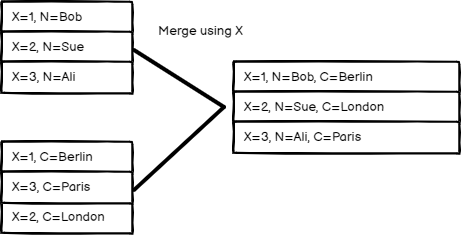
Matching Fields#
Compare items by field values. Enter the fields you want to compare in Fields to Match.
REA Automation's default behavior is to keep matching items. You can change this using the Output Type setting:
- Keep Matches: Merge items that match. This is like an inner join.
- Keep Non-Matches: Merge items that don't match.
- Keep Everything: Merge items together that do match and include items that don't match. This is like an outer join.
- Enrich Input 1: Keep all data from Input 1, and add matching data from Input 2. This is like a left join.
- Enrich Input 2: Keep all data from Input 2, and add matching data from Input 1. This is like a right join.
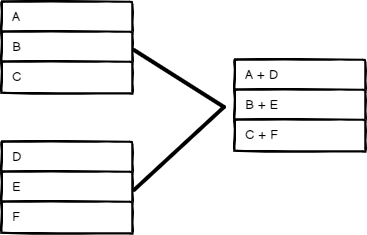
Position#
Combine items based on their order. The item at index 0 in Input 1 merges with the item at index 0 in Input 2, and so on.
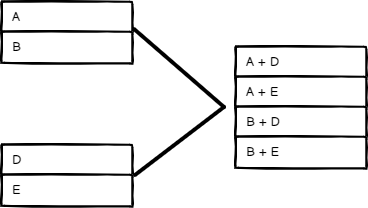
All Possible Combinations#
Output all possible item combinations, while merging fields with the same name.
Combine mode options#
When merging data by Mode > Combine, you can set these Options:
- Clash Handling: Choose how to merge when data streams clash, or when there are sub-fields. Refer to Clash handling for details.
- Fuzzy Compare: Whether to tolerate type differences when comparing fields (enabled), or not (disabled, default). For example, when you enable this, REA Automation treats
"3"and3as the same. - Disable Dot Notation: This prevents accessing child fields using
parent.childin the field name. - Multiple Matches: Choose how REA Automation handles multiple matches when comparing data streams.
- Include All Matches: Output multiple items if there are multiple matches, one for each match.
- Include First Match Only: Keep the first item per match and discard the remaining multiple matches.
- Include Any Unpaired Items: Choose whether to keep or discard unpaired items when merging by position. The default behavior is to leave out the items without a match.
Clash Handling#
If multiple items at an index have a field with the same name, this is a clash. For example, if all items in both Input 1 and Input 2 have a field named language, these fields clash. By default, REA Automation prioritizes Input 2, meaning if language has a value in Input 2, REA Automation uses that value when merging the items.
You can change this behavior by selecting Options > Clash Handling:
- When Field Values Clash: Choose which input to prioritize, or choose Always Add Input Number to Field Names to keep all fields and values, with the input number appended to the field name to show which input it came from.
- Merging Nested Fields
- Deep Merge: Merge properties at all levels of the items, including nested objects. This is useful when dealing with complex, nested data structures where you need to ensure the merging of all levels of nested properties.
- Shallow Merge: Merge properties at the top level of the items only, without merging nested objects. This is useful when you have flat data structures or when you only need to merge top-level properties without worrying about nested properties.
SQL Query#
Write a custom SQL Query to merge the data.
Example:
1 | |
Data from previous nodes are available as tables and you can use them in the SQL query as input1, input2, input3, and so on, based on their order. Refer to AlaSQL GitHub page for a full list of supported SQL statements.
Choose Branch#
Choose which input to keep. This option always waits until the data from both inputs is available. You can choose to Output:
- The Input 1 Data
- The Input 2 Data
- A Single, Empty Item
The node outputs the data from the chosen input, without changing it.
Merging data streams with uneven numbers of items#
The items passed into Input 1 of the Merge node will take precedence. For example, if the Merge node receives five items in Input 1 and 10 items in Input 2, it only processes five items. The remaining five items from Input 2 aren't processed.
Branch execution with If and Merge nodes#
If you add a Merge node to a workflow containing an If node, it can result in both output data streams of the If node executing.
One data stream triggers the Merge node, which then goes and executes the other data stream.
For example, in the screenshot below there's a workflow containing an Edit Fields node, If node, and Merge node. The standard If node behavior is to execute one data stream (in the screenshot, this is the true output). However, due to the Merge node, both data streams execute, despite the If node not sending any data down the false data stream.
Try it out: A step by step example#
Create a workflow with some example input data to try out the Merge node.
Set up sample data using the Code nodes#
- Add a Code node to the canvas and connect it to the Start node.
- Paste the following JavaScript code snippet in the JavaScript Code field:
 1
 2
 3
 4
 5
 6
 7
 8
 9
10
11
12
13
14
15
16
17
18
19
20
return [ { json: { name: 'Stefan', language: 'de', } }, { json: { name: 'Jim', language: 'en', } }, { json: { name: 'Hans', language: 'de', } } ]; - Add a second Code node, and connect it to the Start node.
- Paste the following JavaScript code snippet in the JavaScript Code field:
 1
 2
 3
 4
 5
 6
 7
 8
 9
10
11
12
13
14
return [
	  {
    json: {
      greeting: 'Hello',
      language: 'en',
    }
  },
  {
    json: {
      greeting: 'Hallo',
      language: 'de',
    }
  }
];
Try out different merge modes#
Add the Merge node. Connect the first Code node to Input 1, and the second Code node to Input 2. Run the workflow to load data into the Merge node. Then, try different options in Mode to see how it affects the output data.
Append#
Select Mode > Append, then select Test step.
Your output in table view should look like this:
| name | language | greeting |
|---|---|---|
| Stefan | de | |
| Jim | en | |
| Hans | de | |
| en | Hello | |
| de | Hallo |
Combine by Matching Fields#
You can merge these two data inputs so that each person gets the correct greeting for their language.
- Select Mode > Combine.
- Select Combine by > Matching Fields.
- In both Input 1 Field and Input 2 Field, enter
language. This tells REA Automation to combine the data by matching the values in thelanguagefield in each data set. - Select Test step.
Your output in table view should look like this:
| name | language | greeting |
|---|---|---|
| Stefan | de | Hallo |
| Jim | en | Hello |
| Hans | de | Hallo |
Combine by Position#
Select Mode > Combine, Combine by > Position, then select Test step.
Your output in table view should look like this:
| name | language | greeting |
|---|---|---|
| Stefan | en | Hello |
| Jim | de | Hallo |
Keep unpaired items#
If you want to keep all items, select Add Option > Include Any Unpaired Items, then turn on Include Any Unpaired Items.
Your output in table view should look like this:
| name | language | greeting |
|---|---|---|
| Stefan | en | Hello |
| Jim | de | Hallo |
| Hans | de |
Combine by All Possible Combinations#
Select Mode > Combine, Combine by > All Possible Combinations, then select Test step.
Your output in table view should look like this:
| name | language | greeting |
|---|---|---|
| Stefan | en | Hello |
| Stefan | de | Hallo |
| Jim | en | Hello |
| Jim | de | Hallo |
| Hans | en | Hello |
| Hans | de | Hallo |